the details
HOW MUCH

The WeEdit Bonus
Purchase any four videos or bundles, and your fifth comes free. Simple as that.
How the 5th Freebie Works
For every 4 videos or bundles you purchase, your 5th is free. This applies to both solo edits and full wedding bundles, and you’re free to mix and match. The offer automatically applies as you book — no codes, no chasing, no awkward emails.
It’s our way of rewarding repeat work and long-term collaborations while keeping pricing fair and transparent.
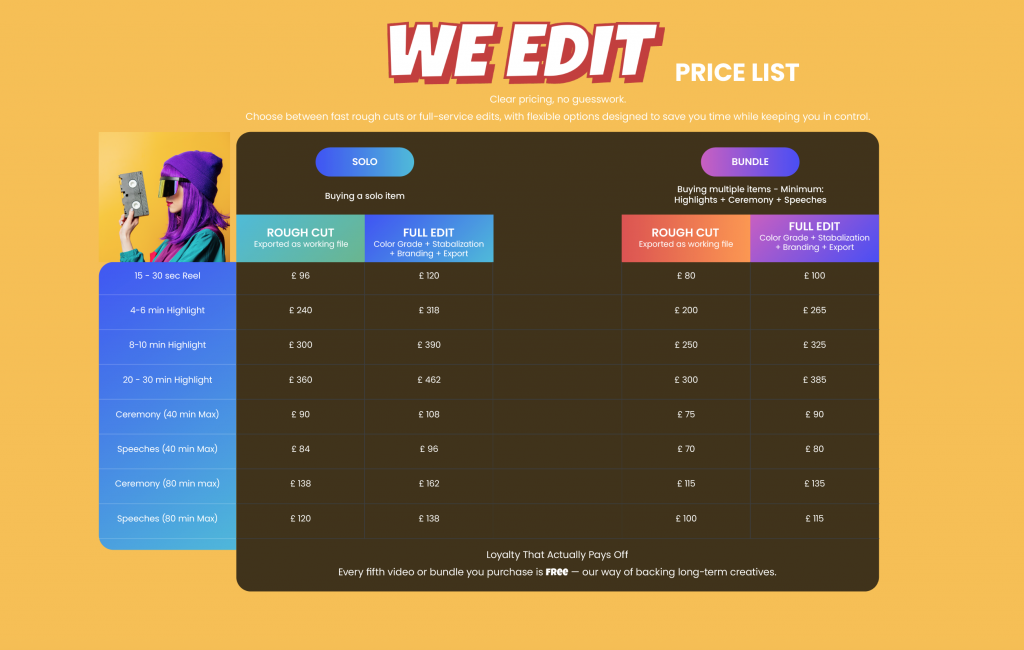
SOLO ITEMS vs BUNDLE PRICING
Solo items are for when you need one specific edit on its own. For example, a single 15–30 second reel, a ceremony edit, or a short highlight film. Each solo item has two pricing options: Rough Cut (edited from proxy files, no revisions) and Full Edit (edited from full-resolution footage, with one round of revisions included).
Bundles are designed for complete wedding projects. If you’re editing a full wedding — such as a highlight film, ceremony, and speeches for one couple — you’ll build your bundle by selecting each item individually and adding the prices together under either the Rough Cut or Full Edit column.
Bundle Requirements
To qualify as a bundle, there is a minimum selection:
One highlight film (choose one):
4–6 minute highlight
8–10 minute highlight
20–30 minute highlight
+ One ceremony
+ One speeches edit
Once this minimum is met, you can add any additional edits you need.
Ideal for Fusion & Multi-Ceremony Weddings
Bundles work especially well for fusion or multi-day weddings, where you may need:
A highlight film
+ A civil ceremony (±20 minutes)
+ A full traditional ceremony (up to ±60 minutes)
+ Speeches
+ Additional cultural or event edits
In this case, you would simply select all required items from the bundle section and combine them to create a tailored editing package for that project.
ROUGH CUT vs FULL EDITS
Rough Cuts are designed for speed and efficiency. If you choose this option, you’ll send us proxy files (lower-resolution versions of your footage), and we’ll edit a clean, well-structured rough cut based on your brief. You’ll receive the full working timeline file back, ready for you to fine-tune, colour grade, or finish in your own style. No revisions are included with rough cuts — this option is about saving time, not handing over the final polish.
Full Edits are our end-to-end service. You’ll upload your full-resolution footage, and we’ll handle the complete edit — pacing, music, storytelling, and polish — aligned with your brand and preferences. One round of revisions is included after you review the first cut. Any additional changes can be added if needed.
HOW TO SEND
your files
HOW TO MAKE
proxy files
⚠️ Important Before Creating Proxies
- Do not rename any files.
- Do not move or restructure folders after proxies are created.
- Do not change file names between original footage and proxy files.
Your editing software links proxies to the original full-resolution clips using file names and metadata. Renaming or moving files will make it impossible to relink the original footage later.